guide to wizarding
info from: https://www.wizard101.com/w101playersguide
Clothing
Clothing is what makes your character unique!
These pieces can be collected from monsters, bought from shops, be rewards for quests, or even won from high-score mini game performances. There are thousands of different designs of clothing, so you always look fresh.
Some clothing can be purchased from the Crowns shop with Crowns, and from the Arena shop with Arena tickets won during Player vs Player Ranked matches.
Clothing
Clothing consists of three pieces:
Hats
Hats cover your head, and sometimes include a mask for your face.
Robes
Robes cover your body, and some come with capes.
Boots
Boots cover your feet, and sometimes your lower legs.
These pieces also come with attribute boosters. They can raise your damage, resistances, max health, max mana, accuracy, and many other statistics.
You can dye your clothes different colors at the Dye Shop in the Wizard City Shopping District.
Clothing - Seamstress
Have you ever found a clothing item or wand you love the look of, but wish it had the stats of something different? Well now you can take the stats of one item and apply them to another item of the same type. Love the stats on your Dragonspyre hat but it doesn't match your Grizzleheim outfit? Find a Grizzleheim hat you like, and move the stats from your Dragonspyre hat, to the new Grizzleheim hat to complete your stylish look.
Eloise Merryweather, who can be found near Zeke in all worlds of the Spiral has been busy learning how to stitch! For a small Crowns fee, she will allow you to transfer the Stats of one item onto the Appearance of another of the same type. (hats to hats, wands to wands, etc)
This process can be reversed through the Unstitching option, however this also costs additional Crowns.
Clothing - Seamstress
Next time you talk to her, select the item you want to use as the Appearance, and the item you want to use for the Stats. Click Create and you'll have a whole new item with the look and stats you want combined into one.
Important things to note about the Seamstress:
- Both items will be removed from your backpack and replaced with the new item
- The name of the item will be transferred from the Stats item, along with the bonuses
- The bonuses of the appearance item will completely disappear, and be overwritten by the bonuses of the stats item, with the exception of No Trade flags. Those will persist to the final item.
- This process can be reversed through the Unstitching option, however this also costs additional Crowns.
- This process costs Crowns
Equipment
Equipment is a significant factor in the overall strength of your character. Similar to clothing, these pieces can be collected from monsters, bought from shops or be rewards for quests. Equipment consists of the following pieces:
Wands - Wands automatically place spells in the equipment cards slot in your deck.
Athames - Athames can give you boosts which include raising damage, resistances, health, mana, accuracy, and many other stats.
Amulets - Amulets come attached with a specific spell card, which they automatically put in the equipment cards slot in your deck.
Rings - Rings can give you attribute boosts which include raising damage, resistances, health, mana, accuracy, and many other stats.
Pets - Pets are another type of equipment. For more information on pets, see the section on pets.
Equipment cont'd
Mounts - Wizard Mounts provide a fast way of getting around. Mounts may be rented for a day or a week, or purchased permanently.
Decks - Different decks come with different restrictions. These restrictions include max number of cards, max copies of each spell, and max copies of your school’s spells.
Equipping your Equipment
To use your items, you must equip them.
To equip items, select them in your backpack & press the hand icon to equip the item.
Equipment Symbols - General Attributes
Resistance
Power Pip Percent
Plus Health
Plus Mana
Plus Damage
Plus Accuracy
Plus Healing
Equipment Symbols - School Specific
Life Attribute
Ice Attribute
Fire Attribute
Storm Attribute
Death Attribute
Myth Attribute
Balance Attribute
Resistance
Power Pip Percent
Plus Health
Plus Mana
Plus Damage
Plus Accuracy
Plus Healing
Equipment Symbols - School Specific
Life Attribute
Ice Attribute
Fire Attribute
Storm Attribute
Death Attribute
Myth Attribute
Balance Attribute
Critical and Block Statistics
The Critical and Block system is an addition to the existing dueling system that allows players to perform Critical Hits on opponents and avoid incoming Critical Hits. This will give players new strategies and defenses in combat and new ways to further build up their Wizard!
Critical and Block Statistics The two new stats being added to the game are called Critical Hit Rating and Block Rating Critical Hit Rating increase the player's chance of getting a critical hit. Block Rating increases the player's chance of avoiding incoming critical hits. Players will gain Critical Hit and Block bonuses from equipment.
The chance for a critical hit or a block is calculated AFTER fizzle and accuracy. When a spell fizzles no calculation for critical hit or block is made. Charms, Enchantments, Wards, Manipulations and Globals are not subject to the Block / Critical system. Heals cannot be Blocked, but they can Critical!
Questing
Overview: Many citizens of the different worlds of the spiral need your help. So as you progress on your journey, make sure you interact with as many individuals as possible. They will offer you quests – sometimes complex and often dangerous tasks.
Yellow Exclamation Point – This character has a quest available for you. Walk up to them and press “X,” or left click to talk and receive your instructions.
Gray Question Mark – You are currently working on a quest for this character. The quest will appear in your quest log, which you can access through the menu, or by pushing ‘Q’. The box in your log tells you where to go to complete the task, what your task is, the rewards for completing the quest, and tracks your progression.
Yellow Question Mark – You have completed the quest for this character and simply need to talk to them to finish it and receive your reward.
Quest Icons on the Map
New and ready to be completed quests will show up on your Map. A yellow ring will indicate who you need to talk to on the Map.
Buildings/Structures
Blue Window Light – You have a quest objective or character in the building/structure and can enter.
Yellow Window Light – You can enter this building/structure.
No Window Light – You cannot enter this building/structure.
Gauntlets
Gauntlets are special Dungeons. If you leave a gauntlet for any reason it resets. Golem Tower is an example of a gauntlet.
Dungeons
Dungeons must be completed to get full credit. Logging out, leaving through the Dungeon entrance, going to another dungeon, playing a Mini-game, going to a PvP or Derby match, or going to your home will reset the Dungeon. Leaving any other way gives you 30 minutes to return before the Dungeon resets.
Dungeons have entry Sigils. If the sigils are lit up, you can enter the dungeon, just walk in to the blue circles, press ‘X’, and wait for the countdown to finish. You can also enter Dungeons with up to four players. To do so, you all have to interact with the circles before the countdown reaches zero.
Your Quest Journal
You can reach your Quest Journal by pressing Q on your keyboard while you are not in a duel. You will see a book showing your current quests.
Here is more information about the different areas of your quest journal entries.
You can reach your Quest Journal by pressing Q on your keyboard while you are not in a duel. You will see a book showing your current quests.
Here is more information about the different areas of your quest journal entries.
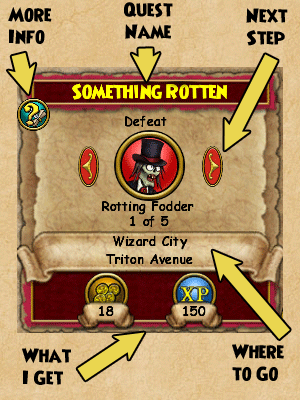
Quest History
Clicking on the 'More Info' button in a quest panel will open a new window that will show you all the conversations you had that have lead you through the steps of that quest. If you're not sure where you should go next, consult this panel for more instructions. The red X returns you to your Quest Panel page..
Clicking on the 'More Info' button in a quest panel will open a new window that will show you all the conversations you had that have lead you through the steps of that quest. If you're not sure where you should go next, consult this panel for more instructions. The red X returns you to your Quest Panel page..
Quest Tracker
The Quest Tracker Arrow is an arrow that will appear at the bottom of your screen indicating the direction you need to go for the quest you are currently embarking upon. Press Ctrl-T on your keyboard, and you will see an arrow at the bottom of your screen indicating the direction you need to travel, and the approximate number of steps it will take your Wizard to reach that destination!
Not all quests qualify for the arrow, some things you just have to find for yourself, young Wizard.
Quest Finder
Having trouble finding what quest you need to do next? Looking for something new to do? Now you can simply press a button and find a nearby quest!
When you press the Quest Finder Button in your Journal the Quest Helper arrow will now point to the nearest available quest. Quest Finder will look for quests within your current area, then expand to the current world you are in. If it doesn't find any quests in that world, you will need to move to another world and press Quest Finder again. When you use Quest Finder, a window will appear telling you where to go and who to talk to, and the Quest Helper arrow will now point to that location.
Quest Rewards
Below are definitions of the icons you will see in your Quest Rewards panel.
Amulets
Athames
Boots
Gold
Hat
Potion
Ring
Robe
Spell Deck
Reagent
Furniture
Treasure Card
Wand
Experience
Quest Rewards
Item Rewards appear in your Backpack. You will receive a message above your character's head when you complete the quest and receive the item.
Experience Rewards will add to your current Experience points.
Potion Quest Rewards will show up beside your Health and Mana Vials.
Training Point Quest Rewards will add to your current total of Training Points.
If you are on a quest that requires you collect items from creatures during duels, you will receive confirmation messages as to whether you received that item or not after each duel.
Dungeon Quests The first time you complete a quest within a dungeon you receive 100% of the experience for the quest. The second time you complete the same quest within that same dungeon, you receive 50% experience for that quest. All subsequent times you complete that quest within that dungeon, you do not receive any experience. You will always receive full experience for duels against creatures, just not goals related to the quest.
Second Chance Chests
Have you ever battled your way through a tough dungeon, only to be disappointed that you didn't receive the reward you wanted? Well now players can pay a small Crowns fee to get a second chance at what's in the creatures pockets!
Many final boss encounters will contain a chest in the room that offers players a second chance to get the item they wanted off the creature they just defeated. Simply use the chest after your initial duel, pay a few Crowns and you are given a second chance at the exact same rewards the boss drops normally. These chests can only be used a certain number of times per day per character.
Each time you use the chest, the price will increase. There's no guarantee you will receive the item you had hoped, these are Second Chance chests, and nothing in life is guaranteed.
Quest Tracker
The Quest Tracker Arrow is an arrow that will appear at the bottom of your screen indicating the direction you need to go for the quest you are currently embarking upon. Press Ctrl-T on your keyboard, and you will see an arrow at the bottom of your screen indicating the direction you need to travel, and the approximate number of steps it will take your Wizard to reach that destination!
Not all quests qualify for the arrow, some things you just have to find for yourself, young Wizard.
